Bonsai Watering for Slackers - Part 1
For this project, TheConnMan and I combined two of our greatest loves:
- Mine: having plants, but not actually having to take care of plants.
- TheConnMan’s: Slack, the chat tool. He’s concerningly obsessed with it…
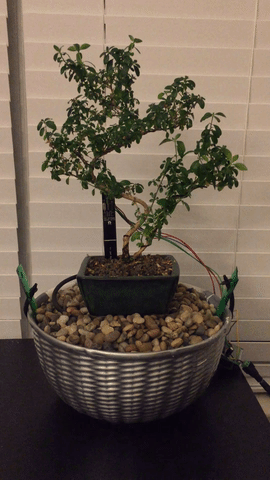
First, the final product:
As before, similar projects exist out on the internet, because the internet is cool like that, so we took a look for some inspiration. Here are a couple of the projects that we ended up combining:
| Inspiration for Arduino shield design | Inspiration for mechanical watering design |
 |
 |
The special sauce that we’ll add to our project is an integration with the popular chat application Slack, so your system will let you know when it’s watering your tree!
There is, though, one unfortunate caveat up front: we tried a couple of different soil moisture sensors, but each one corroded pretty quickly when used around the clock. Our biggest pain point was keeping the tree watered while we are away on vacation, so we’ll be using the system only for that purpose moving forward. If you have any leads on a better soil moisture sensor that can withstand sitting in soil for extended periods of time (more than about 1 month), let us know in the comments!
As always here are the additions to our toolbox for this particular project:
List of Parts
| Electronic Components | ||
|---|---|---|
|
ESP8266 Serial Wifi Wireless Transceiver Module |
 |
We used this module before in the Echo Blinds project, and as promised, we'll use it many more times. It allows the system to talk to the internet. |
|
DC 12V Submersible Mini Pump |
 |
The specific brand of motor doesn't matter so much, but make sure it's fully submersible in water. We used a different motor |
|
LM2596 DC-DC Buck Converter Step Down Module |
 |
This project is a bit more complicated than the last because it requires us to use 3 different voltages. The motor requires 12 V, but the Arduino can't run on anything more than about 5-7 V. Our sensor will require 3 V. This little module allows us to take the 12V voltage from the outlet and step it down to 5V to power the Arduino. |
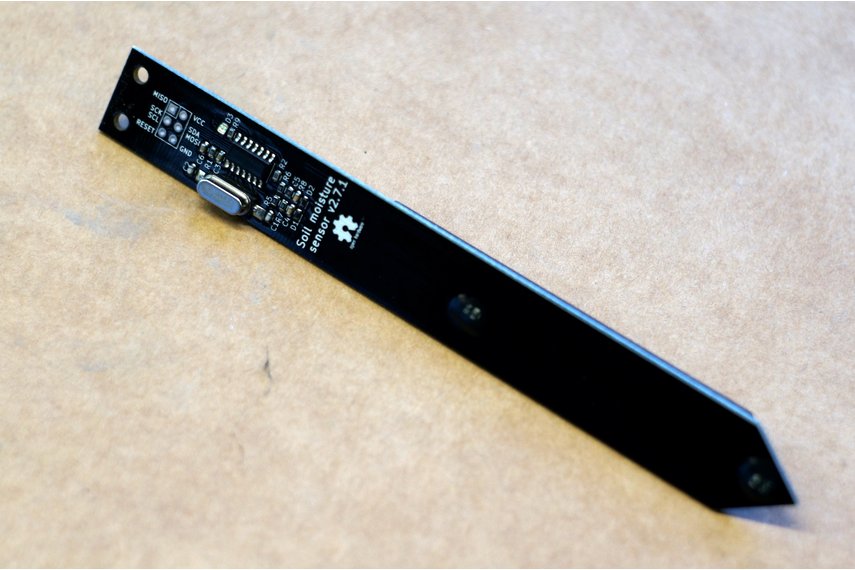
| I2C Chirp! Soil Moisture Sensor |
|
As mentioned above: we have yet to find one that won't corrode in a fairly short period of time. We first used a
soil resistivity-based sensor |
|
Semiconductor Bipolar Transistor |
 |
Here's a new toy to play with. Transistors are useful for many applications, and in this project we'll use it as a switch to allow current to flow to the motor only when we want it to. Remember how the motor needs 12 V to work? The Arduino outputs can only supply about 5 V, so the transistor will help us control the current coming directly from the wall socket. Learn a little bit more about the magic of transistors here. About 4 transistors were harmed in the making of this project :(. |
| Mechanical System Parts | ||
|
12-inch Planter Bowl |
 |
For the base, we'll need a large basin of some kind. I ended up going to a local TJMaxx and picking out a kitchen mixing bowl and an aluminum sieve (see below) that fit together. This basin seems to be about the right dimension. Whatever you choose, make sure it won't leak water in any way. |
|
7-1/2" Stainless Steel Mesh Colander |
 |
The most important thing here is to make sure the colander will fit in your basin when turned upside down. Also make sure it's made of a material that won't rust when under water for a long time. |
|
5/16"ID, 1/2"OD Silicone Tubing |
 |
We'll need tubing with these dimensions that can withstand frequent water transfer. The exact brand or color doesn't matter in this case. |
|
1/2" Sprinkler Converter with Two 1/4" Barb Outlets |
 |
We'll use this little guy to split the larger tubing into smaller tubing to feed to the bonsai tree. |
|
Drip Irrigation 1/4" Tubing |
 |
This is the tubing that will go directly to the tree. I've used the brand listed here, but found that it's very stiff and hard to maneuver, so may be worth taking a look at some PVC clear flexible tubing |
|
Drip Irrigation 1/4" Tubing Stakes |
 |
In my version of the project I broke an old green ruler in two to hold up the water tubes, but that may be pushing the limits of "pretty dece". If you want to be more legit, try these fancy stakes. |
|
16 lb Box of River Rocks |
 |
Rocks rock! Make sure to lift with your legs, not your back. |
| General Toolbox Additions | ||
|
Heat Shrink Tubing |
 |
We'll need these puppies to reinforce some solder joins that'll be submersed in water. In general, we'll need them when joining two wires together. |
|
Mini Heat Gun |
 |
To shrink the shrink tubing, we'll need a heat gun. Hair dryers won't work. I tried. |
|
Desoldering Wick |
 |
This project was particularly frustrating with the amount of soldering, unsoldering, and resoldering that happened, so I gave in and got some wick to get rid of extra solder blobs. I have a feeling it'll come in handy again. |
|
Rosin Soldering Flux Pen |
 |
Flux can also help with cleaner soldering. |
All right! Now that we’re stocked up, let’s get down to business! First, we’ll test each individual part to make sure each is working as intended and then put it all together.
Test the ESP8266
We used this little guy in the Echo Blind Openers project, so repeat steps 2 and 3 from that post to make sure he’s working.
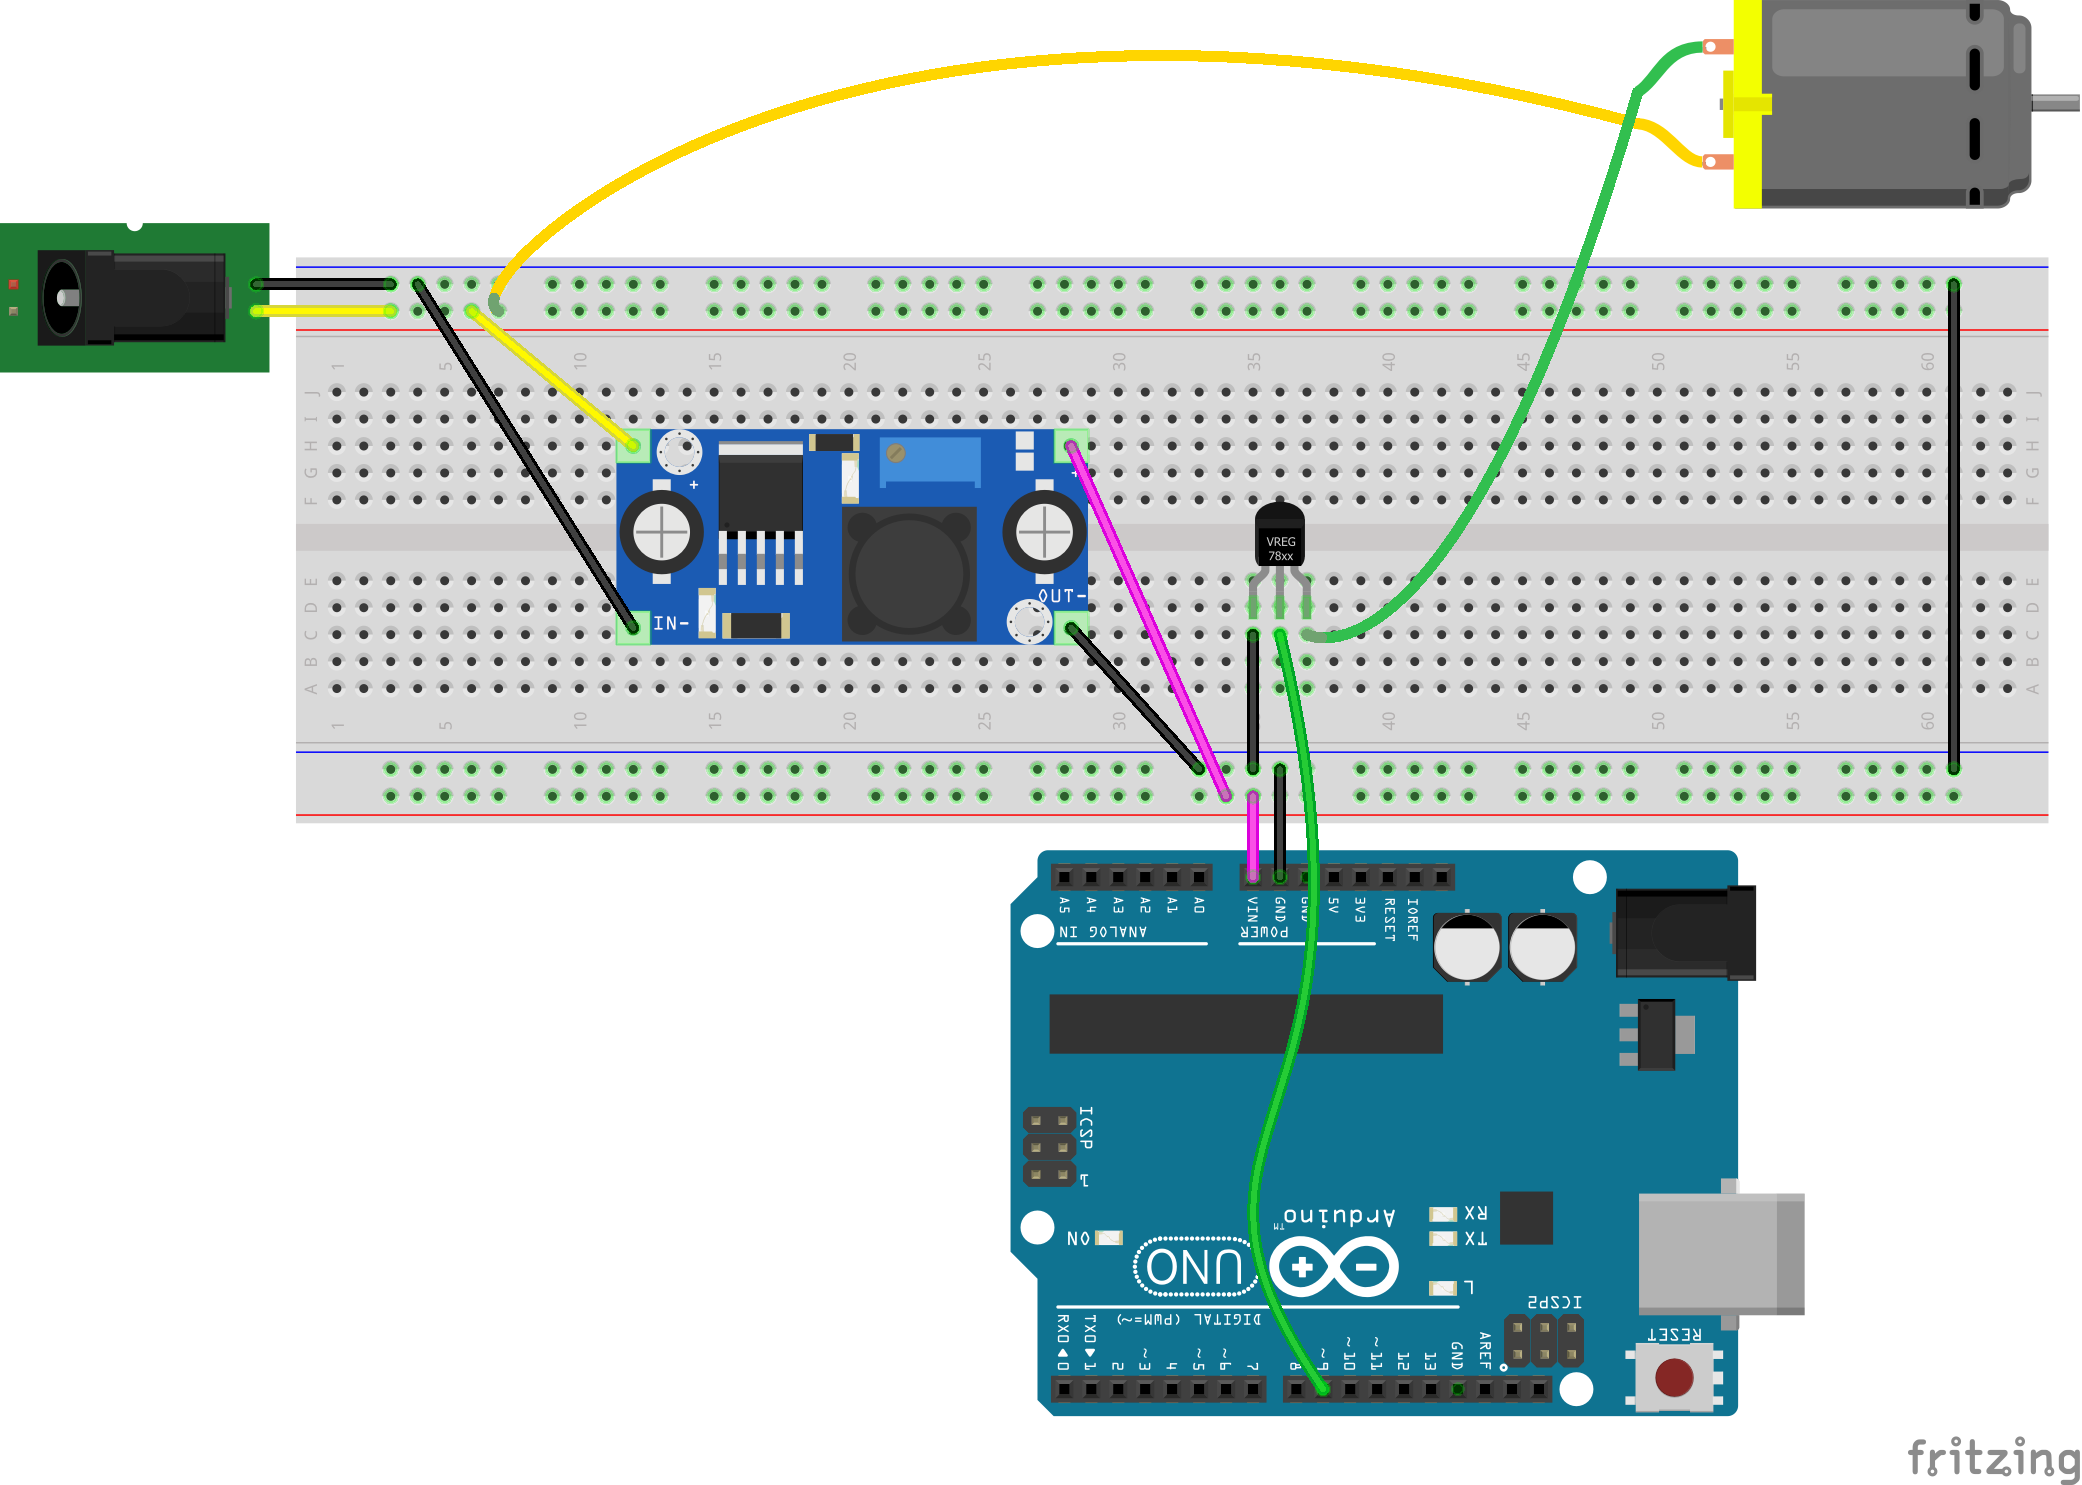
Test the LM2596 Step Down Module
Next, try out the step down module. Set up the breadboard as shown below and plug the jack into a power supply plugged directly into a wall socket. You can turn the little gold knob on top of blue box using a small flat-head screw driver to vary the output voltage.
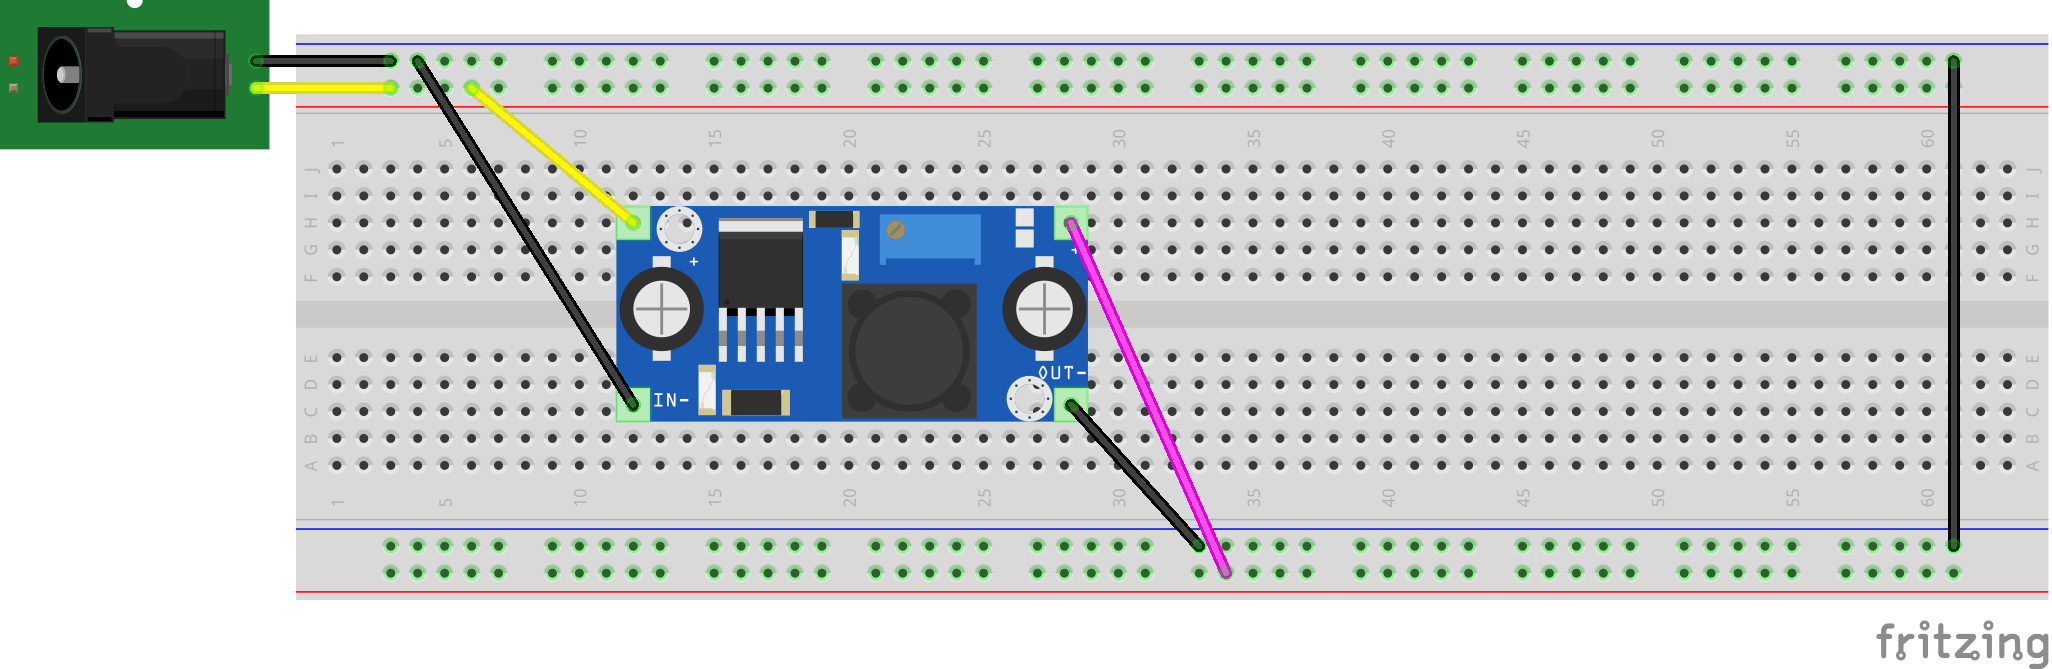
Use a multimeter to measure the output voltage at the bottom of the breadboard. We want to get it to about 5 V.

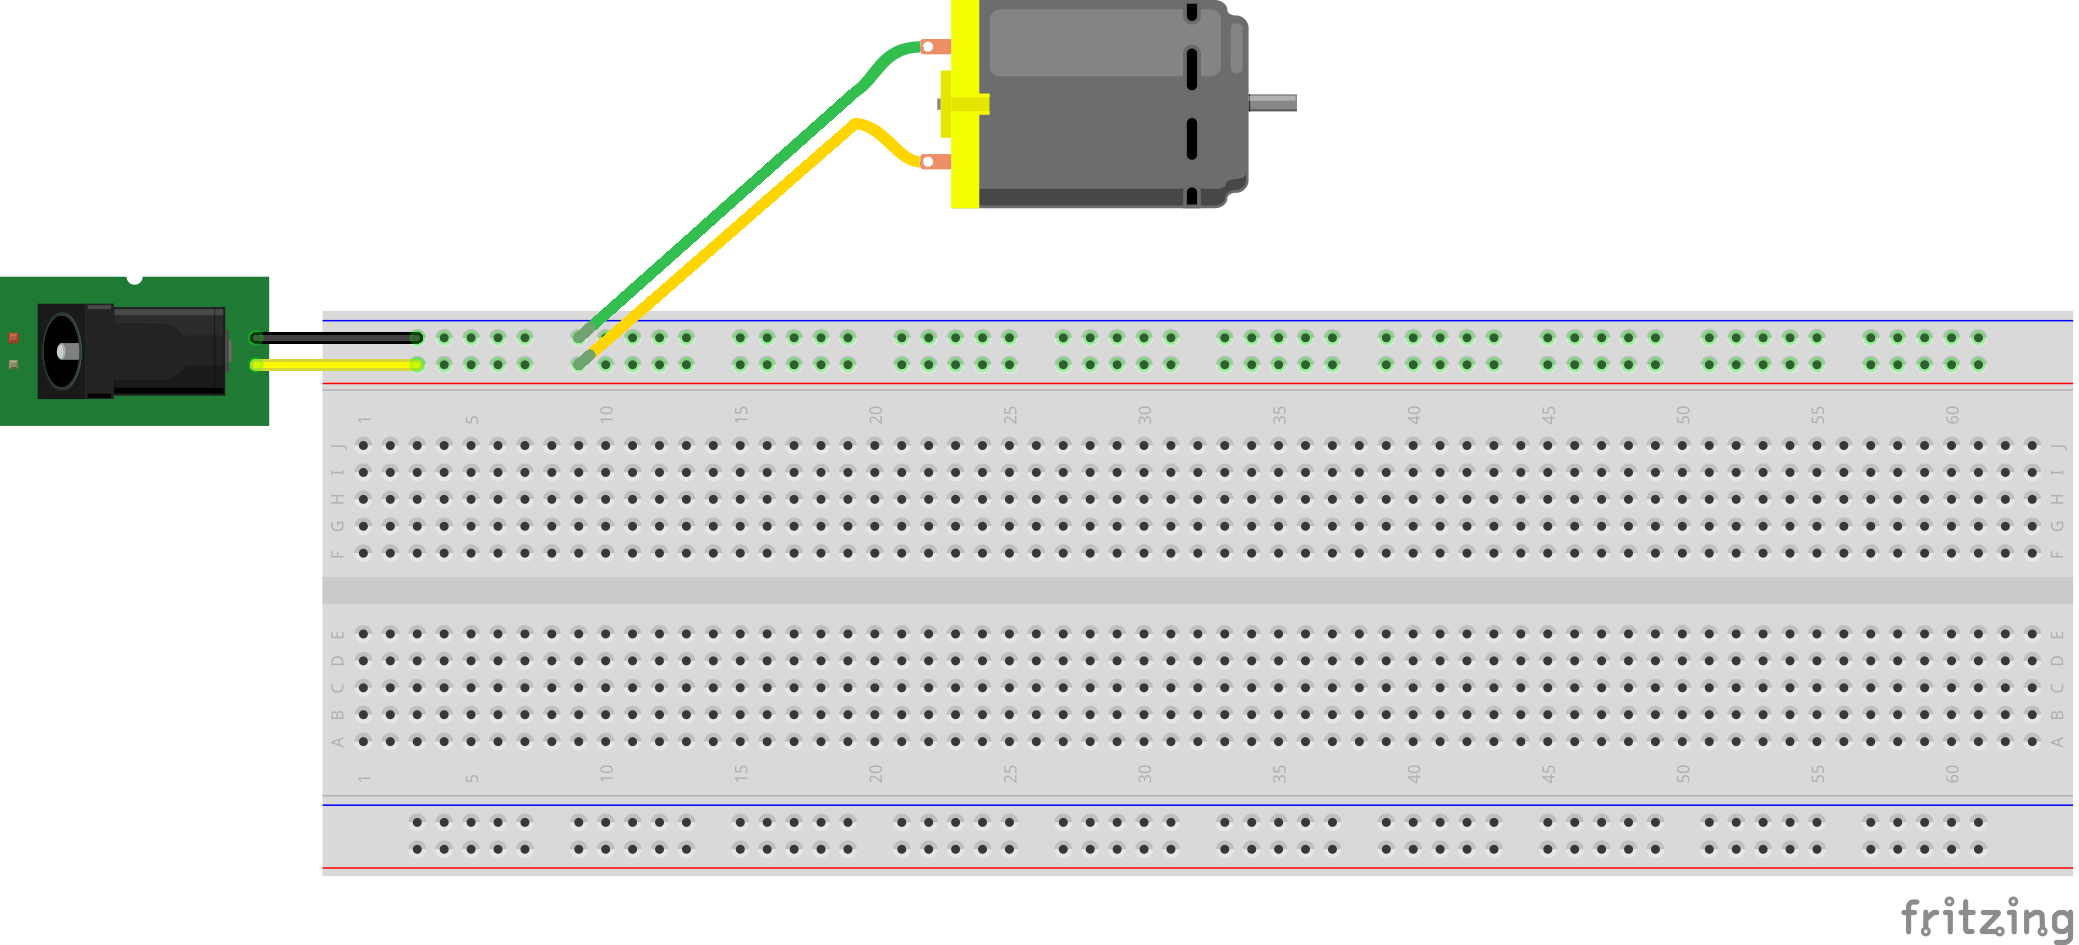
Test the Water Pump
Ok, now let’s try out the water pump. Please note: you must run the pump under water. It may get damaged if you run it in plain air. Go ahead and plug the jack right into a wall socket power source to make sure the pump runs normally at full force.
Test the Transistor
Ok, now the fun part. Let’s try out the transistor. Set up the circuit as shown below and run the code underneath it.
The Arduino should power up normally (touch the bottom of it after about a minute in this configuration to make sure it’s not heating up too much–if it is heating up too much, you may need to dial down the output voltage on the step-down module). Then the motor should turn on at full speed for 10 seconds, shut off for 10 seconds, then turn on at about half-speed for 10 seconds. The LED on the Arduino should also turn on when the motor is on.
Here's what's happening with the code. We're using the PWM feature of one of the analog pins on the Arduino to modulate how frequently the transistor gets power. When we supply the transistor base with power, that closes the circuit to allow the motor to run. The lower the frequency, the slower the motor will run. This feature will come in handy when we calibrate the system later to make sure the water isn't overshooting your tree.
Roll your mouse over the paragraph above to highlight the related lines of code in the snippet below.
Test the Soil Moisture Sensor
Lastly, we’ll need to test the moisture sensor. Go ahead and hook it up, then stick it in a glass of water.
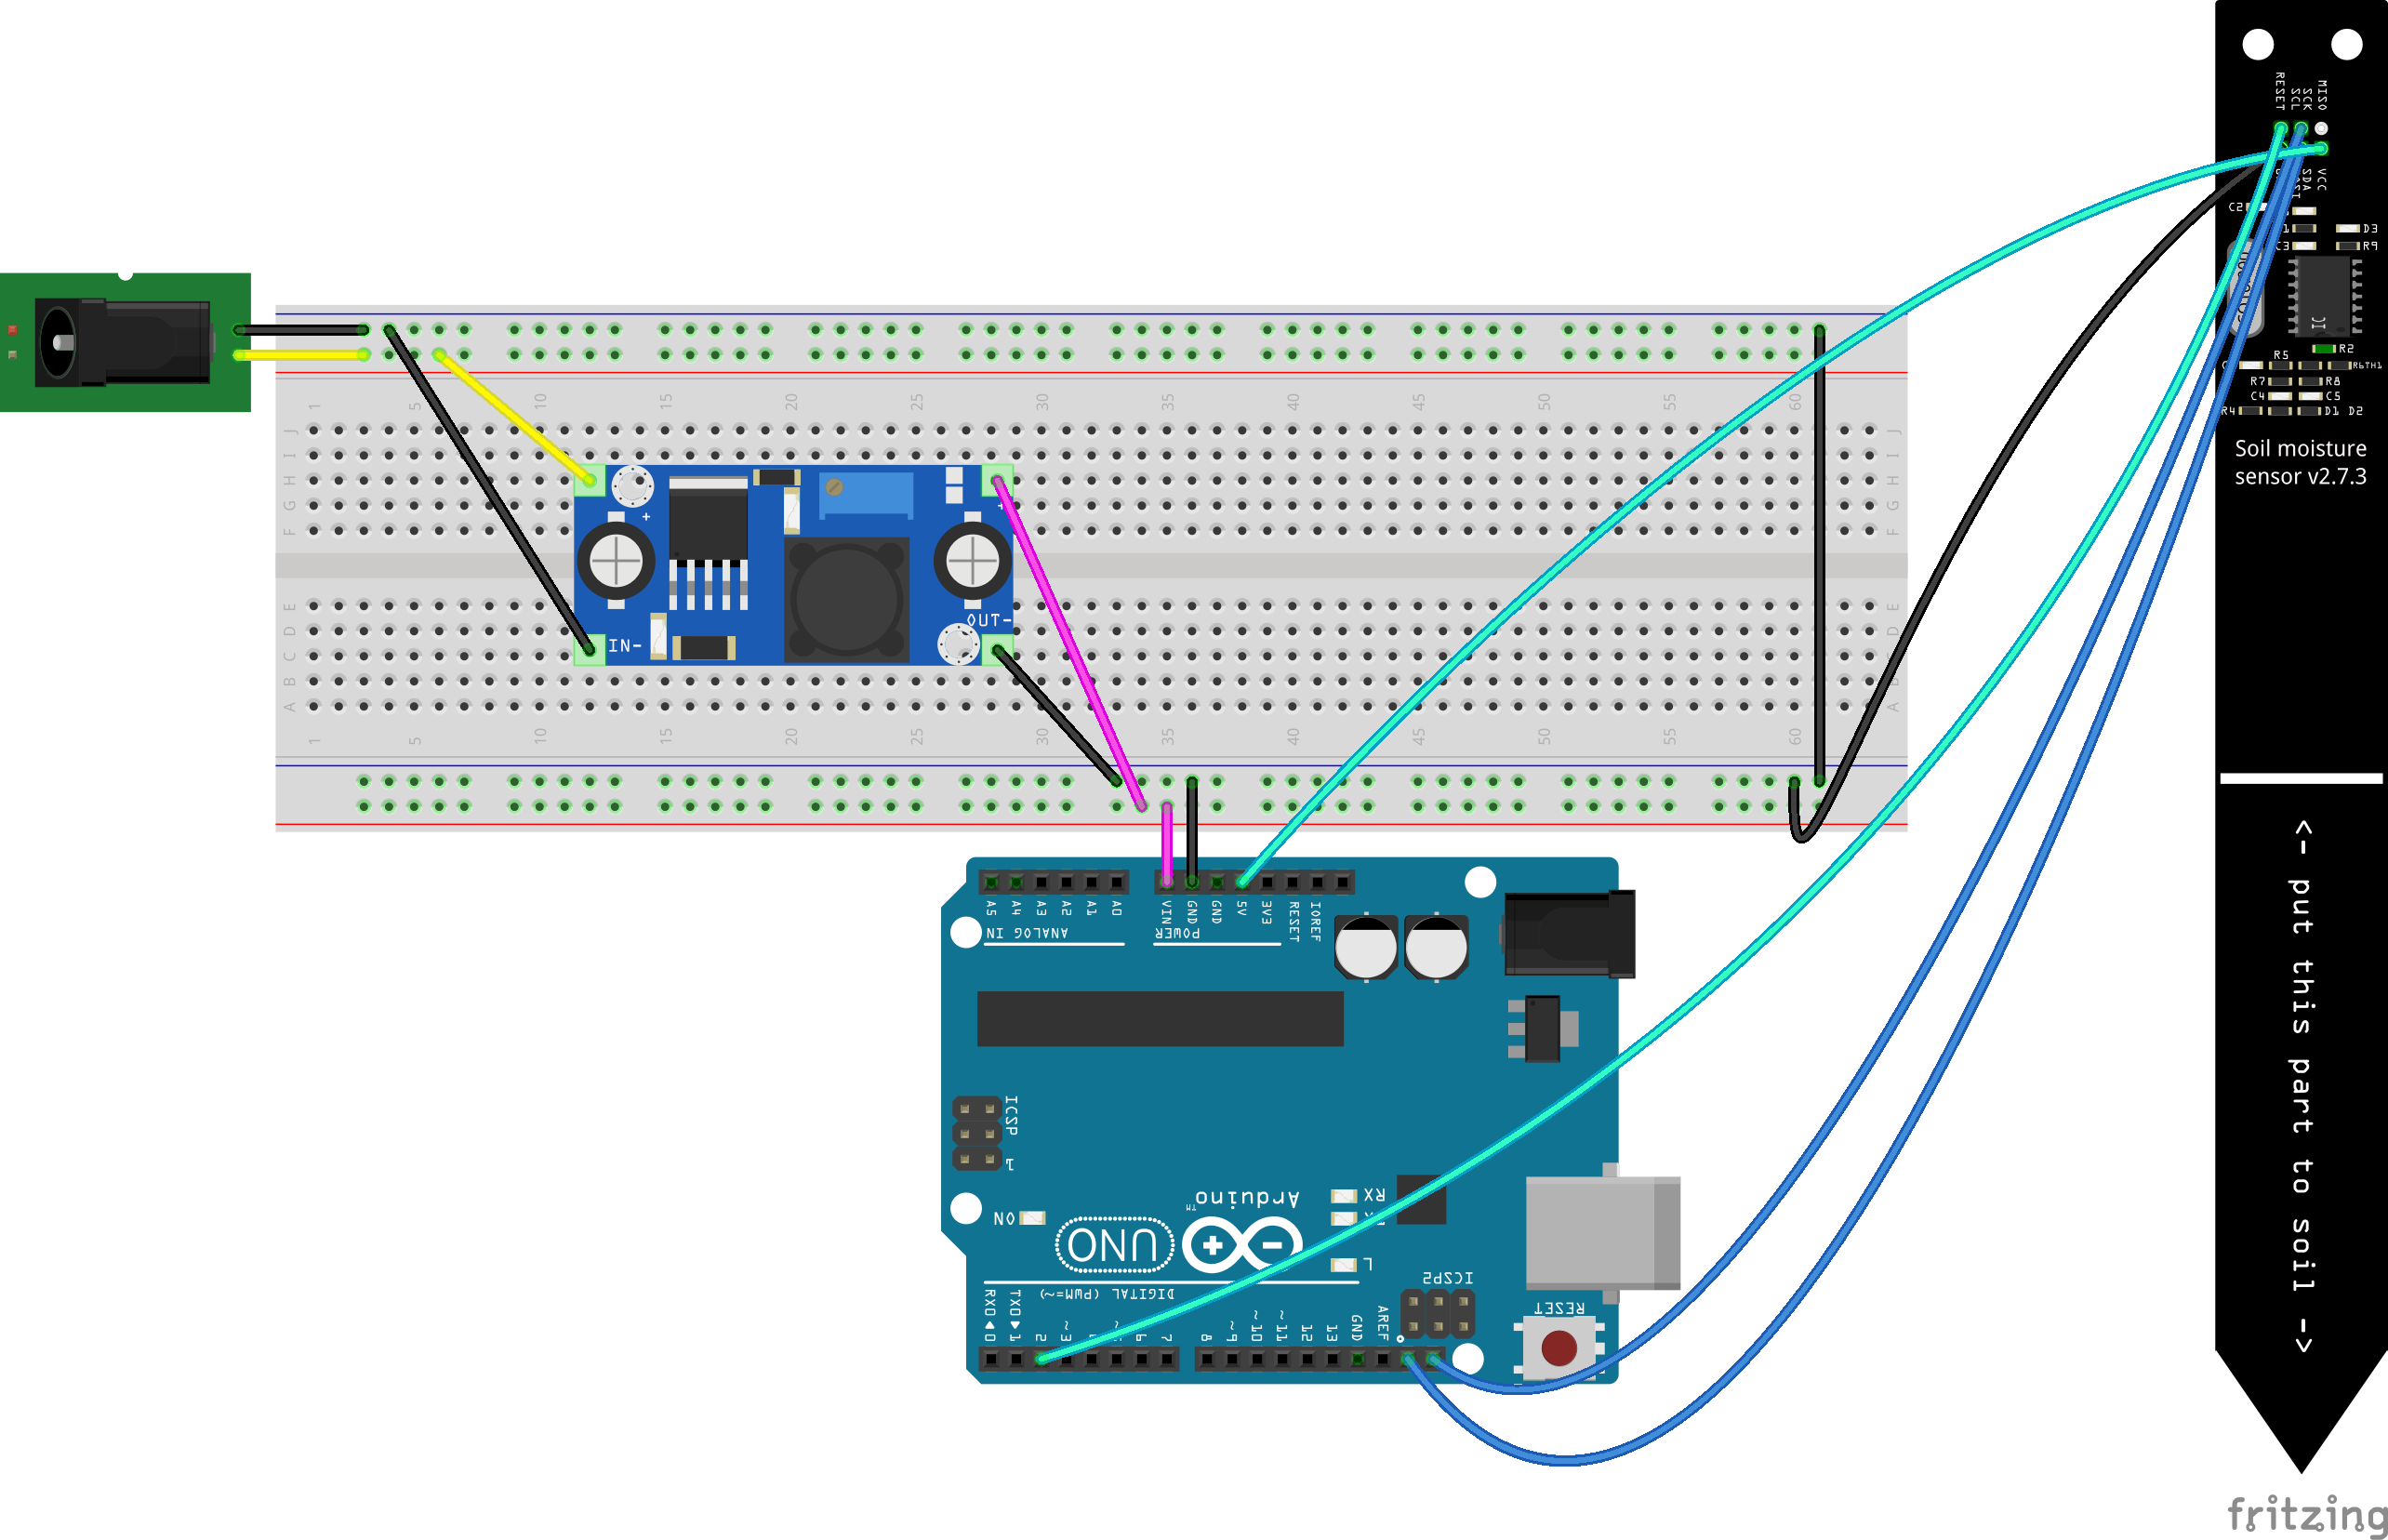
Run the code below and wait about 30 seconds. Nothing should be happening.
Now take the sensor out of the water and let it be in plain air. After a few seconds the Arduino yellow LED should turn on. That means the sensor has triggered an output! Basically, when the sensor is in water, it thinks the “soil” is moist enough. When it’s in air, it’s way too dry, so it triggers a response! You can also track the Serial Monitor where we print the sensor reading every 10 seconds.
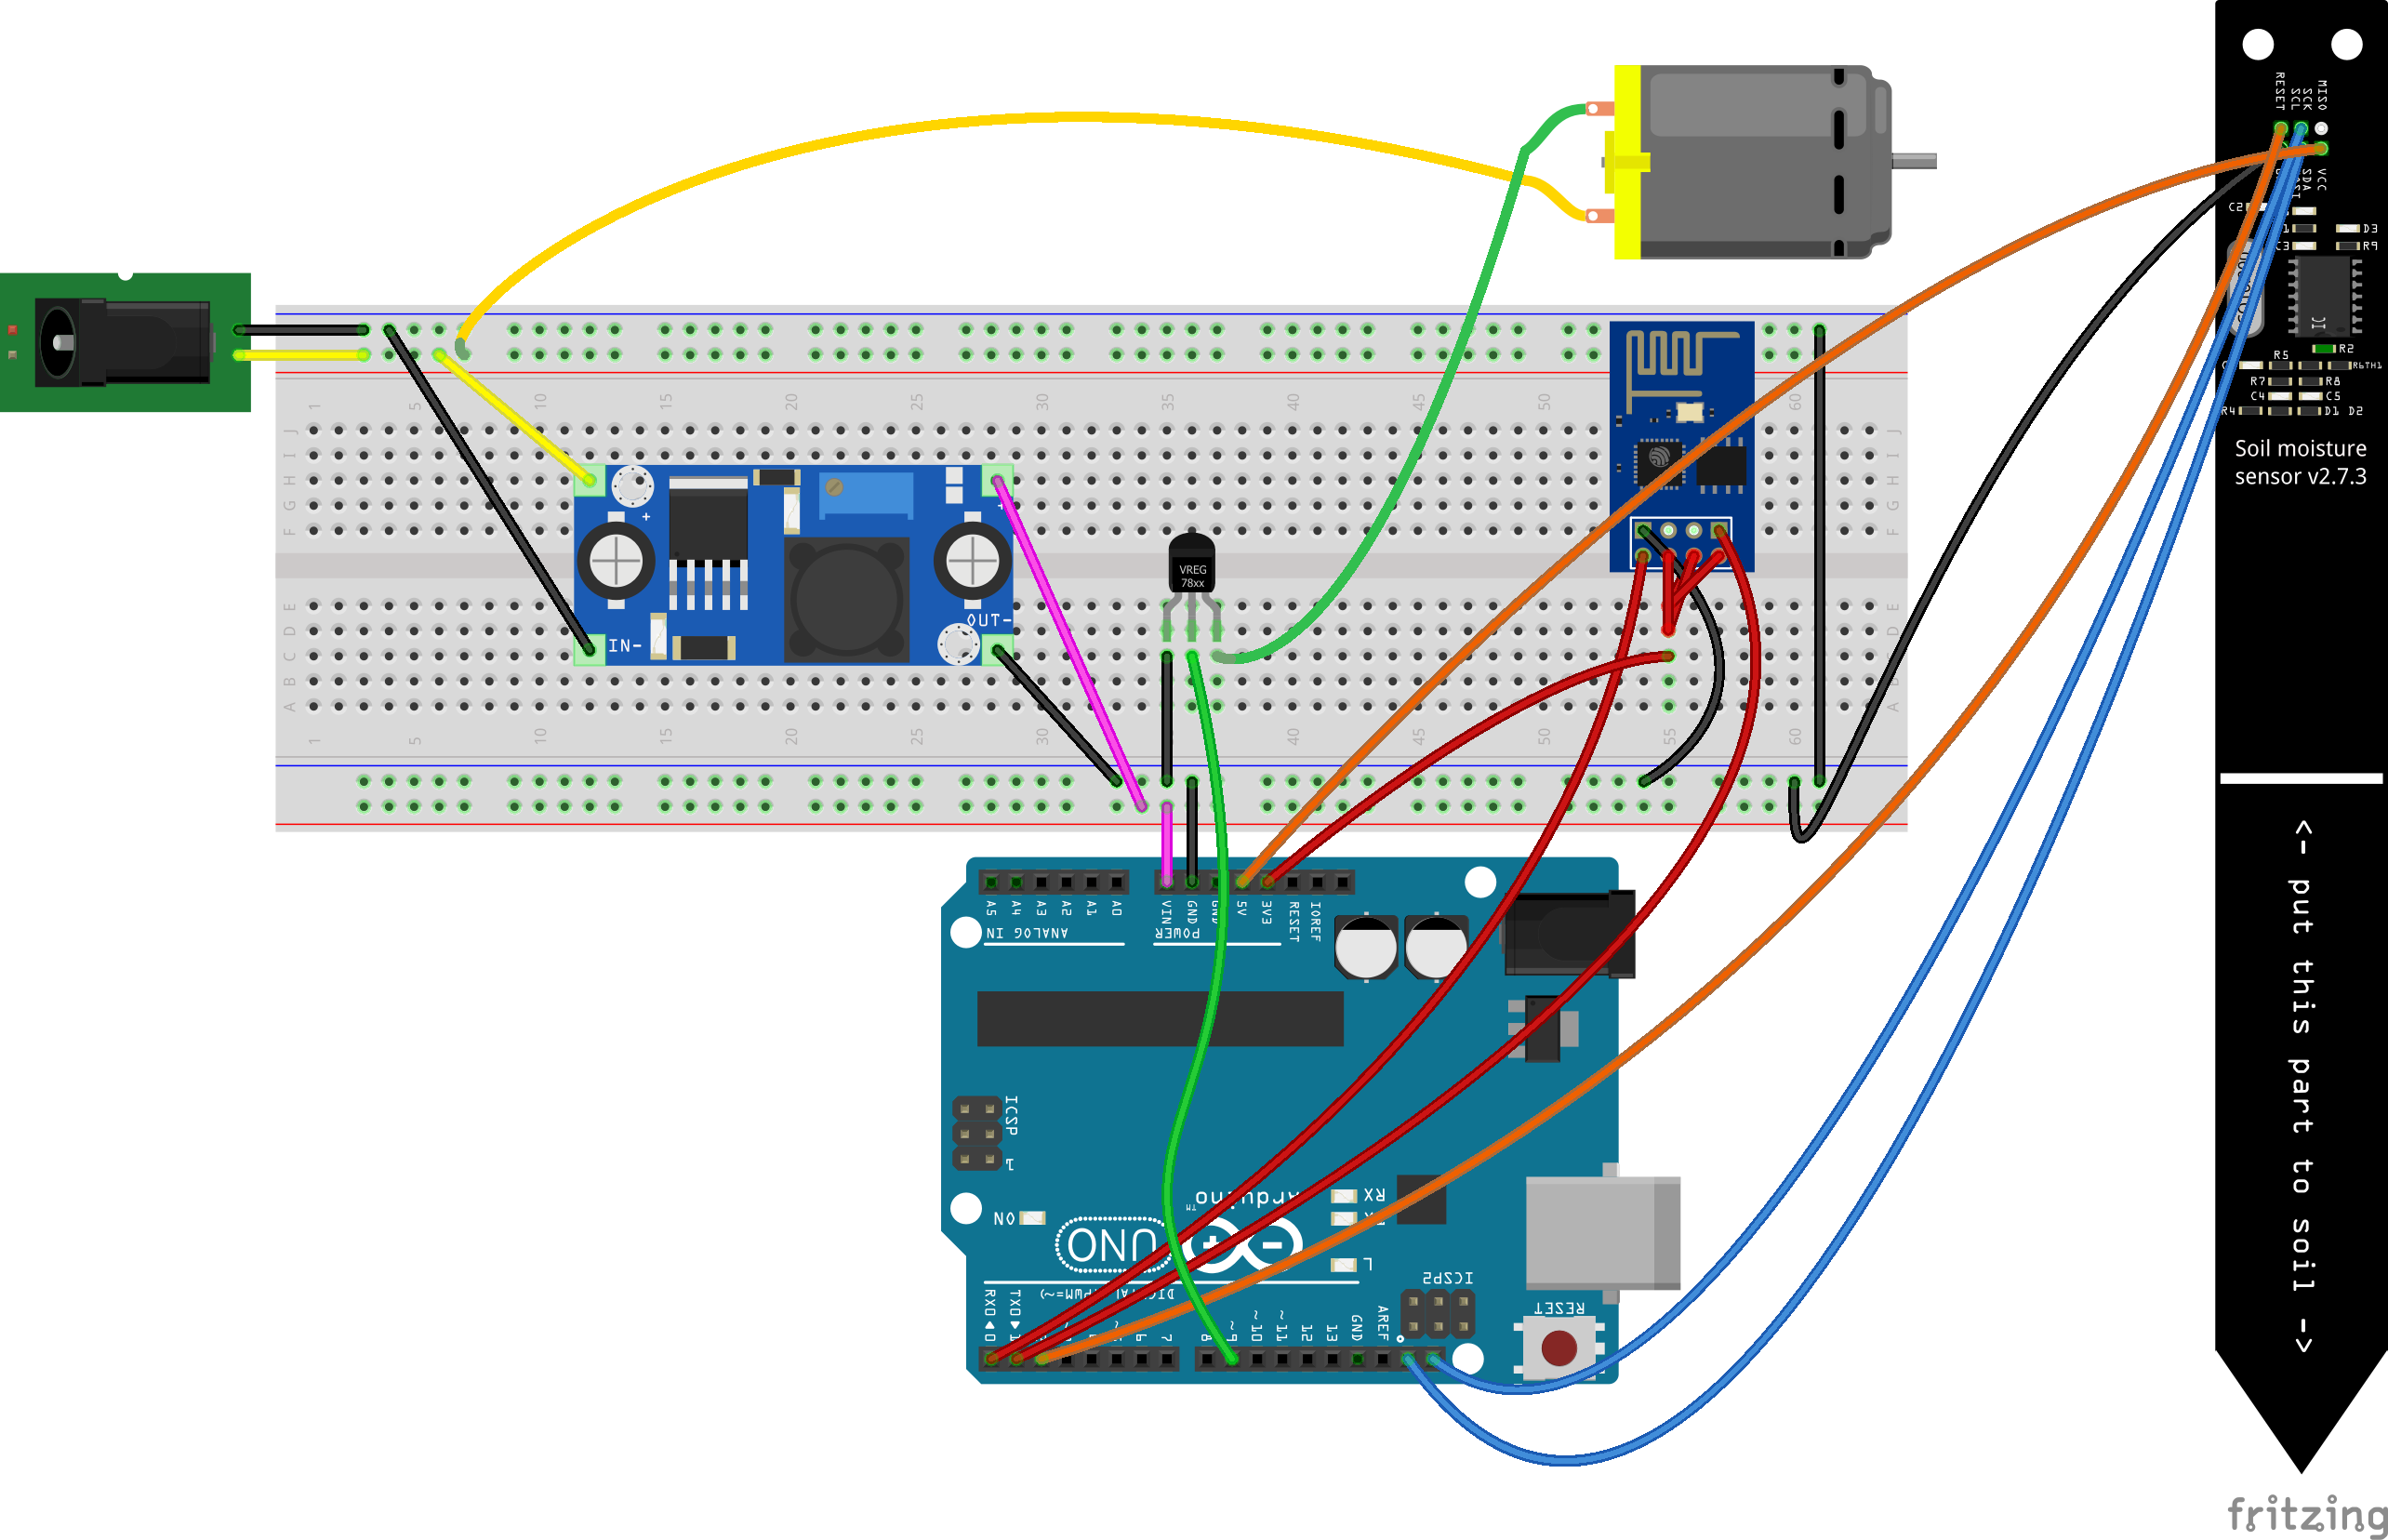
Build the prototype
Now we’re ready to put it all together!
Here’s the breadboard view:
And the schematic:
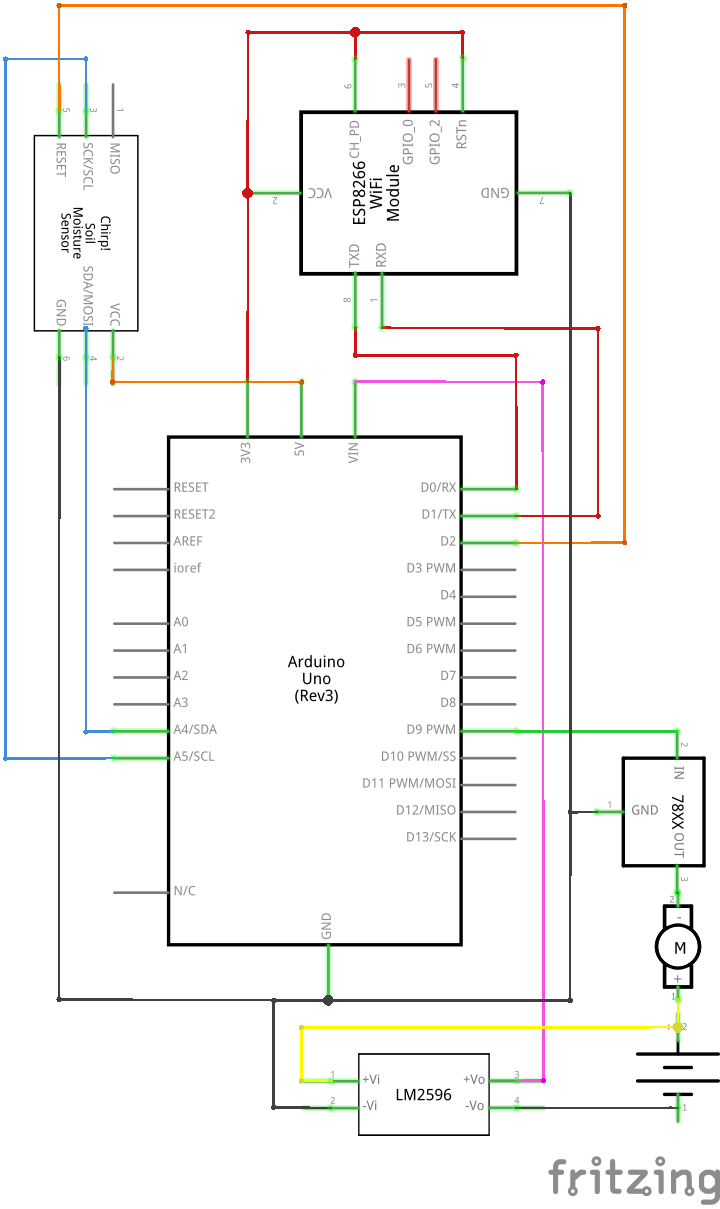
Side-note, it’s my goal for the next project to learn more about wire management and circuit design. These are starting to look pretty gnarly. Comment below if you know of any good learning resources!
Run the Code
Here’s the full code. Try it out for now, and in the next blog installment we’ll walk through how to set up a Slack channel to start receiving messages from your tree! For now, try lifting the sensor in and out of a glass of water to activate the motor (make sure it’s also in water).
Extra Bonus
The reason this project took so long is I had to learn a lot of new stuff for it. And even after I had figured out transistors (after frying 4 of them), step-down modules, analog modulation, and I2C protocols and finally got the thing to work, it turned out that Fritzing didn’t have the parts I needed to build the pretty circuit pictures for the blog!
Soooo, I present to you my first ever open source project contributions:
- LM2596 DC-DC Buck Converter Step Down Module pull request
- I2C Chirp! Soil Moisture Sensor pull request
The pictures you see in the blog above for the Chirp! Moisture Sensor and the Step Down Module were slapped together by yours truly, and are now part of the official Fritzing core parts library!
If you fancy making yourself some parts, here’s a good set of instructions: Make Your Own Fritzing Parts Tutorial.
Happy automating and see you next time for a deep-dive into Slacking!
-JMad